Installation
Hardware
Single Board Computer: Raspberry Pi 4B 4 or 8 GB of RAM with recommended Raspberry Pi OS
SD Card: Minimum 32 GB (better 64 or more)
Audio Interface: MCHStreamer Kit or MCHStreamer Lite
Robot Platform: THYMIO II robot
Digital Microphones: 5 Adafruit I2S MEMS Microphone Breakout - SPH0645LM4H
Breadboard and Jumper Wires for connecting the microphones to the audio interface
Loudspeaker: CE32A-4 1-1/4” Mini Speaker Driver 4 Ohm or equivalent
DAC: Adafruit I2S 3W Class D Amplifier Breakout - MAX98357A or equivalent SparkFun I2S Audio Breakout - MAX98357A
Powerbank to power the Raspberry Pi: suggested 5000mAh or more min 2A out
Sofware
Install Raspberry Pi OS (Raspbian 64 bit OS) on the SD card using Raspberry Pi Imager:
Enable SSH
Enable VNC
sudo raspi-configCreate a virtual environment with Conda or other tool of your choice:
Install miniconda:
wget "https://github.com/conda-forge/miniforge/releases/latest/download/Miniforge3-Linux-aarch64.sh"

bash Miniforge3-Linux-aarch64.sh
Create conda environment: (if not active run:
source ~/miniforge/bin/activate)
conda create -n <env_name> python=3.11.2
Install the required python packages:
pip install -r requirements.txt
Install specific packages if needed:
PortAudio:
sudo apt-get install libasound-dev libportaudio2 portaudio19-dev
Thymiodirect (from github):
pip install thymiodirect@git+https://github.com/epfl-mobots/thymio-python
Clone the repository:
git clone https://github.com/activesensingcollectives/SonoRo_swarm.git
Install and configure the audio interface:
Follow the instructions and set up the soundcard to work with I2S mics. SonoRo uses
AllRatefirmware to work with I2S microphones.
Assembly and Setup
- Assembly:
Connect the Raspberry Pi to the MCHStreamer audio interface via USB.
Connect the MCHStreamer to the Raspberry Pi via USB.
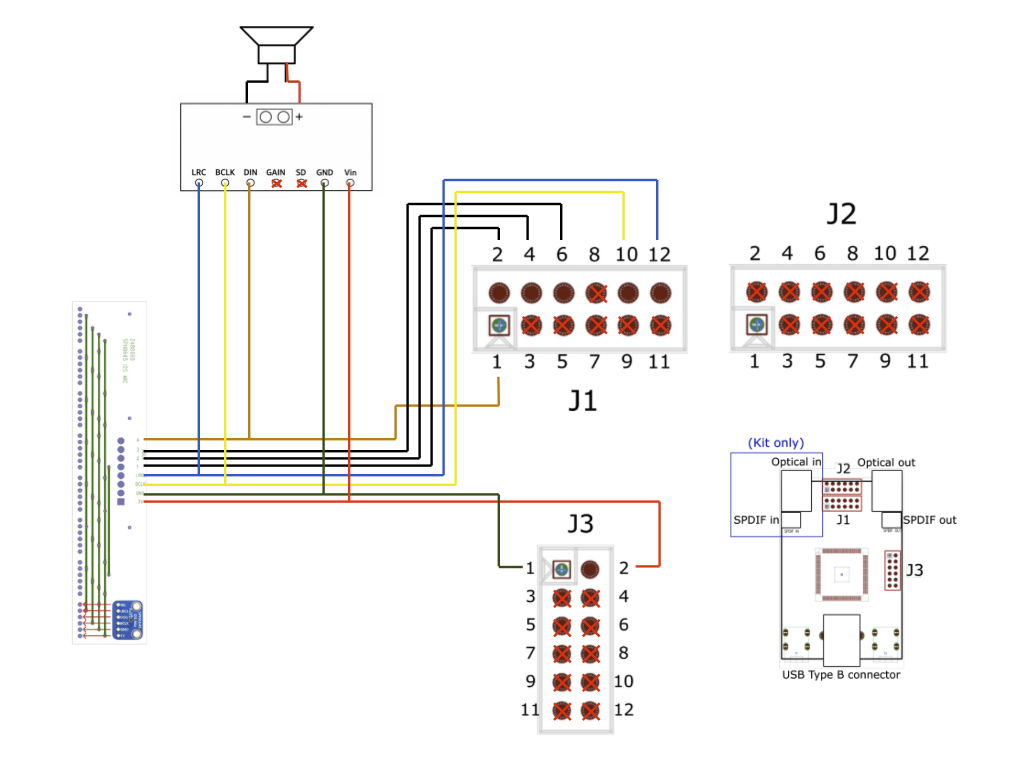
Connect the DAC to the MCHStreamer with jumper wires (I2S connection).
Connect the Loudspeaker to the DAC.
Connect the 5 I2S microphones to the audio interface according to the provided wiring diagram, using the breadboard and jumper wires.
Connect the Thymio robot to the Raspberry Pi via USB.
Insert SD card into the Raspberry Pi.
Power on the Raspberry Pi using the powerbank (All the other components are powered from the Raspberry Pi).
Assembly diagram showing connections between Raspberry Pi, audio interface, microphones, DAC and loudspeaker.
Detailed wiring instructions and diagrams can be found here:
Build guide
- Setup:
Connect to the Pi via SSH or VNC.
Follow the software installation steps above from step 2.
Go to the Usage section to learn how to run the robot.